In modern manufacturing and engineering, surface roughness is a key measure of product quality and performance. It impacts wear resistance, friction, coating adhesion, corrosion resistance, and electrical conductivity. To ensure surface quality meets design requirements, manufacturers use standardized measurement methods.
Surface roughness charts and finish conversion tables help engineers make informed decisions. These tools allow them to balance machining quality with cost control.
If your products require a high level of surface finish, this guide will be a valuable reference.
What is surface finish?
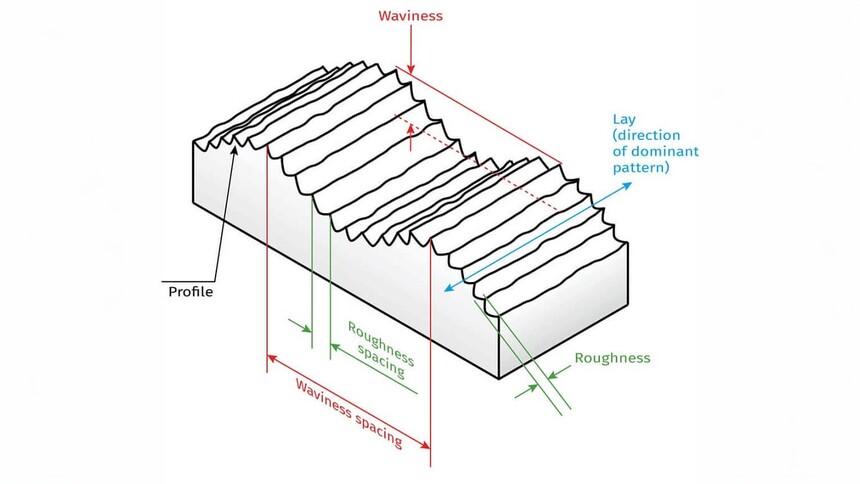
Surface finish refers to small irregularities on the surface of a material. It is usually measured by roughness, and common parameters include Ra (average roughness) and Rz (maximum profile height). These values affect the function, life and appearance of the part. When evaluating finish, we look at three areas: roughness, corrugation, and layering.
Roughness is defined as a small difference in surface height. This metric is produced by machining processes such as cutting or grinding. When we refer to surface finish, we are referring primarily to roughness.
Ripple is the periodic undulation of the surface of a part. This is usually caused by machine vibration or instability. Excessive corrugation may affect the fit and performance of the part.
Hierarchy, on the other hand, relates to the direction of the surface texture. It is largely determined by the trajectory of the machining tool. It affects the friction characteristics of the surface in different directions.
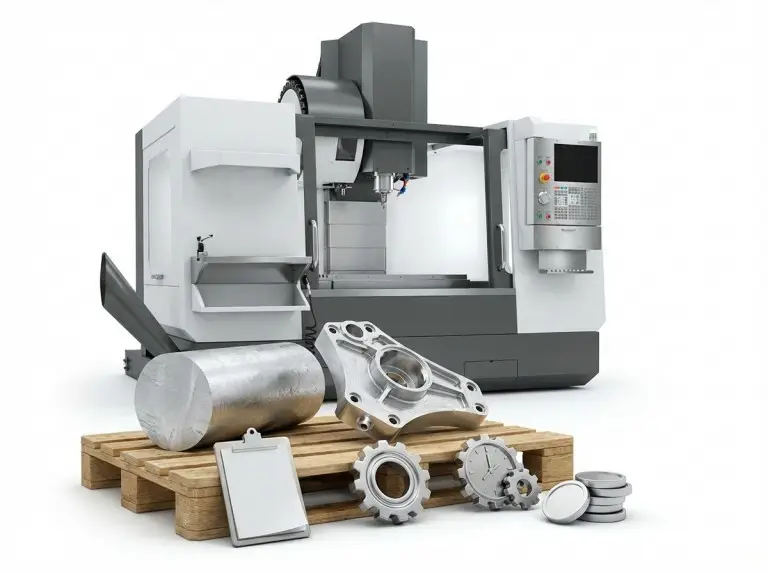
As industries like aerospace and automotive become more precise, surface finish has become a key part of quality control. In CNC machining, finish is one of the key quality criteria.
Further Reading: Metal Surface Treatment
Why is surface finish so important in the engineering process?
Surface finish plays a critical role in engineering and manufacturing. This metric directly affects the performance, appearance and durability of a product. Whether it’s a mechanical part, an electronic device, or a consumer product. This metric is important.
Controlling finish can effectively improve friction and increase corrosion resistance. It also enhances coating adhesion and boosts electrical conductivity. In addition, surface finish is important for the aesthetics of a product. This is especially true in high-precision manufacturing and demanding industries. The quality of the surface finish usually determines the final performance and service life of the product.
Parts with a good surface finish have the following advantages:
Reduced friction and longer life: Smooth surfaces effectively reduce friction between parts. This in turn reduces wear and tear, thereby significantly extending product life.
Improved chemical and corrosion resistance: Higher finish reduces microscopic defects. This effectively places the penetration of chemicals and corrosive substances. This enhances chemical and corrosion resistance.
Promotes adhesion of coatings and paints: smooth surfaces make it easier for coatings and paints to adhere evenly. This improves the durability and strength of the coating.
Enhances visual appeal: A high gloss surface makes products such as consumer goods more attractive. Surface quality directly affects the user’s perception and experience of the product.
Eliminate surface defects: Enhanced Finish can easily eliminate or minimize small surface defects. This in turn further improves the overall quality of the product.
Improvement of electrical conductivity: The smoother the surface, the lower the corresponding resistance. This is useful for parts that need to improve electrical performance.
Enhanced wear resistance: Optimizing the finish improves the wear resistance of the product. It also reduces the friction effect, making the product more durable in use.
How to measure surface roughness
Measuring surface roughness is essential for ensuring product quality and performance. Accurate data on surface characteristics helps optimize machining processes and extend product life. Different methods suit various materials and requirements. Measurement tools fall into two categories: contact and non-contact.
1. Contact Methods (Stylus Probe Instruments)
Contact methods involve a needle moving along the surface to record height changes. This generates roughness data. These methods are highly accurate, cost-effective, and ideal for hard materials. However, they may slightly damage soft materials and are slower than non-contact methods.
2. Non-Contact Methods (Optical, Laser, or X-Ray)
Non-contact methods use optical, laser, or X-ray technology to capture surface contours. They are fast, non-damaging, and ideal for precision parts or soft materials. However, the equipment is expensive and less effective on reflective or transparent surfaces.
3. Comparative Methods
This technique assesses roughness by comparing a product’s surface to a standard sample. Manufacturers prepare samples with known roughness levels. The product is then visually and tactilely inspected against these samples to ensure quality.
Various methods for measuring surface roughness
The surface finish of a part can be measured using a variety of methods, some of which include:
Profiling Technique: The profiling technique measures roughness by cutting or grinding a surface. It is a destructive method and is typically used in a laboratory setting. This technique provides in-depth analysis of surface properties and provides highly accurate data. However, because it destroys the surface, it is not suitable for finished product or in-process inspection.
Area Technique :The area technique is specifically designed to measure the average roughness of a large surface area. It obtains overall roughness data by analyzing the entire surface area. This method is particularly suitable for inspecting surfaces with complex shapes or large part sizes. However, it is unable to capture detailed information on small, localized areas.
Microscopy Techniques: Microscopy techniques use high magnification microscopes to make measurements. Examples include electron microscopy or atomic force microscopy. It is used to measure the roughness of tiny surfaces and is particularly suited to research areas with nanometer-scale precision. This method is commonly used in semiconductor and nanotechnology. It provides very detailed information about the surface.
Inductive Method : The inductive method measures the distance to the surface by means of an inductive sensor. This method is particularly suitable for metals or conductive materials. It is highly accurate and non-destructive and is often used to inspect the surfaces of precision parts. Inductive methods are widely used in aerospace and electronics manufacturing where surface quality is critical.
Machine method : The machine method uses a measuring system in the CNC machine. It measures the surface roughness directly during machining. This technique is suitable for mass production and also monitors quality in real time. It not only improves efficiency, but also ensures product consistency.
Ultrasonic Method : The ultrasonic method uses sound waves to measure surface roughness. It works well for inspecting large structures or surfaces that are hard to reach, like pipes or ship hulls. As a non-contact and non-destructive technique, it is widely used in industrial inspection to monitor large structural surfaces.
Surface Roughness Chart Symbols and Abbreviations
When you want to understand the concept of machining surface roughness charts in detail. You may find some of the data difficult to understand. If you can’t understand the data accurately. It is also difficult to make measurements at a later stage.
To help you understand better. We have organized the relevant concepts as well as the diagrams corresponding to them.
Ra – Average Surface Roughness
Ra is the most commonly used surface roughness parameter. It measures the average deviation of the surface height relative to the centerline. By calculating the average of small fluctuations, Ra provides a simple indicator of the overall finish of a surface. It is a commonly used indicator in surface quality control. It is especially important in parts with high smoothness or wear resistance requirements.
Rmax – Maximum Vertical Distance from Peak to Valley
Rmax represents the maximum vertical distance between the highest peak and the lowest valley on a surface. This parameter provides information on the extreme roughness of a surface. It highlights the highest and lowest points and is often used to assess extreme defects. Particularly suited to products that require strict smoothness. Rmax identifies potential problems that affect functionality and ensures that the surface is not excessively rough.
Rz – Average Maximum Height of Contour
Rz calculates an average value by measuring the difference in maximum height across multiple sampling segments. It reflects the height difference of irregular contours on the surface and provides more detailed information on localized peaks and valleys than Ra. Rz is suitable for applications where detailed surface analysis is required. It can help identify localized defects and assess overall smoothness, ensuring part durability and functionality.
Surface Roughness Chart
The Surface Roughness Chart is a generalized surface quality tool chart. It provides a clear visual data reference for engineers and manufacturers. The charts allow the user to see the typical range of surface roughness (e.g. Ra, Rz, etc.) that can be achieved by each process. These charts are used during the design and production process to ensure that the surface finish is in accordance with the requirements. This in turn improves product performance and reliability.
Surface Finish Conversion Chart
The Surface Finish Conversion Chart is a tool used to compare the surface quality of different machining processes. It helps manufacturers to convert metric and imperial units to ensure that the surface finish meets the requirements.
Explanation of common roughness parameters:
Ra: Average roughness, used to indicate surface smoothness.
RMS: Root Mean Square Roughness, similar to Ra.
Rt: Distance between the highest and lowest point on the surface.
N Grade: Standardized grade for surface roughness.
Cutoff Length: The length of the sample required to measure surface roughness.
| Ra (Micrometers) | Ra (Microinches) | RMS (Microinches) | N Grade | Rt (Micrometers) | Cut-off Length (Millimeters) |
| 0.025 | 1 | 1.1 | 1 | 0.3 | 0.08 |
| 0.05 | 2 | 2.2 | 2 | 0.5 | 0.25 |
| 0.1 | 4 | 4.4 | 3 | 0.8 | 0.25 |
| 0.2 | 8 | 8.8 | 4 | 1.2 | 0.25 |
| 0.4 | 16 | 17.6 | 5 | 2 | 0.25 |
| 0.8 | 32 | 32.5 | 6 | 4 | 0.8 |
| 1.6 | 63 | 64.3 | 7 | 8 | 0.8 |
| 3.2 | 125 | 137.5 | 8 | 13 | 2.5 |
| 6.3 | 250 | 275 | 9 | 25 | 2.5 |
| 12.5 | 500 | 550 | 10 | 50 | 2.5 |
| 25 | 1000 | 1100 | 11 | 100 | 8 |
| 50 | 2000 | 2200 | 12 | 200 | 8 |
Surface Roughness Chart Cheat Sheet
| Micrometer Grade | Microinch Rating | Description | Application |
| 25 | 1000 | Rough surface produced by forging or sawing processes | Suitable for unfinished gaps or rough-processed structural components |
| 12.5 | 500 | Surface roughness due to heavy cutting or coarse feeding | Used for gap surfaces, often in stress-requiring areas |
| 6.3 | 250 | Common in milling, drilling, or grinding processes, with rougher surface | Suitable for mechanical parts with stress requirements |
| 3.2 | 125 | Rougher surface treatment, suitable for parts carrying high loads | Commonly used for parts subjected to vibration and high stress |
| 1.6 | 63 | Better surface finish, commonly used in precision machining | Suitable for parts produced under controlled conditions |
| 0.8 | 32 | High-precision machining, typically requiring strict control and surface treatment | Suitable for parts that do not need to support heavy loads or continuous motion |
| 0.4 | 16 | Fine grinding or polishing, suitable for applications with high smoothness requirements | Used for surfaces needing high smoothness |
| 0.2 | 8 | Surface obtained through precise polishing, used for sliding components or special parts | Components where rings and seals must slide smoothly |
| 0.1 | 4 | Extremely high-quality surface treatment, commonly used in precision instruments and highly sensitive devices | Used for precision instruments and gauges |
| 0.05-0.025 | 2-1 | The most refined surface, achieved through super-finishing or polishing | Suitable for precision measuring tools and sensitive measurement devices |
The Surface Roughness Chart Memo Sheet can help engineers quickly understand different surface finish requirements and apply them to specific scenarios. Below is a concise description of surface roughness grades and applications:
Rough Surface: 25 micron grade. Mostly used for roughing areas such as large parts and structural components that do not require high precision.
Medium roughness: 6.3 to 3.2 microns. Commonly used for machining mechanical parts, suitable for parts that are subject to stress and meet certain accuracy requirements.
Fine surface: 1.6 to 0.4 microns. Suitable for parts requiring a smooth fit and precise control, such as precision machinery and transmissions.
Ultra-fine surface: 0.2 micron or less. Applied to high-precision fields, such as instrumentation, optical equipment and precision gauges.
What are the factors that affect surface finish?
The main factors affecting surface finish include:
Type of Coolant : Different coolants change how hot and smooth the cutting process is. The right coolant can help reduce heat and make the surface smoother.
Cutting Settings : How fast the tool moves, how much material it cuts, and how deep it cuts all affect the surface quality. Faster cutting speeds and smaller cuts usually give a smoother finish.
Machining Process : Different processes like milling, turning, and grinding create different surface finishes. Precision methods like grinding and polishing usually make the smoothest surfaces.
Vibration : When machines or materials vibrate during cutting, it can cause bumps and make the surface rough. Reducing vibration is important to get a good, smooth surface.
How to improve surface roughness
Common methods to improve surface roughness include:
Improving cutting conditions: adjusting cutting speed, feed rate and depth of cut. Higher cutting speeds and smaller feeds usually improve surface finish. In addition, ensuring that the right tool angles are used and that tools are kept sharp can also significantly improve roughness.
Choosing the right machining technique: Different machining methods can affect how smooth the surface turns out. Using precision techniques like grinding, polishing, or honing can create a smoother finish.
Choose the right raw material: The hardness and toughness of the material can change how rough or smooth the surface will be. Picking materials that are easier to work with can help control surface roughness and improve the final result.
Summarize
At Yonglihao Machinery, we understand that surface finish is critical to product performance. It directly impacts durability, reliability, and appearance. That’s why we are fully committed to ensuring every surface finish meets both design and functional requirements.
Using advanced measurement methods and tools, we help our customers maintain strict quality control, even in the most complex manufacturing environments. Our team continually refines processes, leveraging surface roughness charts and finish conversion tables to ensure every product meets the highest standards.
As experts in CNC machining services, we know how important surface finish is to your product’s success. If achieving superior performance is your goal, contact us today. Let us help you deliver exceptional results with precision and quality you can trust.


