
At Yonglihao Machinery, we cut paper parts. We make them for prototypes, packaging samples, labels, templates, and presentation-grade inserts. Paper seems simple. But it acts like a fast ignition material under a laser. Control heat input, airflow, and motion. Then paper cuts turn out crisp, repeatable, and stain-free.
This guide shows how paper laser cutting works. It covers which laser type fits your job. It tells what paper works best. It explains how to set settings for clean cuts without scorching. We add a practical workflow. We include safety basics and troubleshooting. This helps you go from first test to reliable production.
What Is Paper Laser Cutting ?
Paper laser cutting is a digital method. It cuts without contact. It makes precise shapes. It removes paper along a programmed path. The main reason to use a laser is for fine detail. It avoids mechanical loading or deforming the sheet.
Laser cutting fits well for intricate geometry. It suits tight repeatability or fast design changes. It helps with clean edges on delicate patterns. These would tear or fray with knife methods.
It is not always the best tool for every paper job. For straight cuts on stacks of sheets, a guillotine can be faster. For one fixed pattern at very high volume, hard tooling can lower unit cost. This happens once the tooling pays off.
Further Reading: Sheet Metal Laser Cutting: Process, Types & Tips
How Laser Cutting Paper Works?
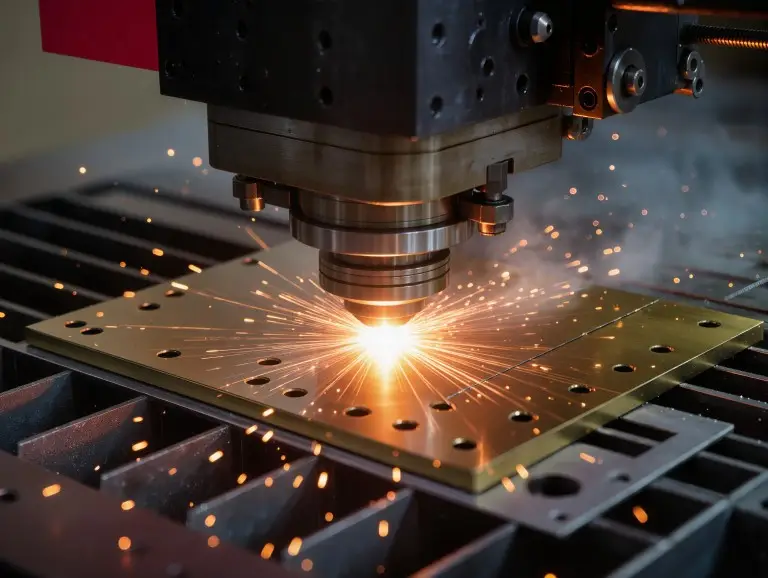
Laser cutting paper focuses energy into a small spot. It moves that spot along a vector path. The paper heats fast. Then it breaks down. It vaporizes or ablates in the kerf. This leaves the cut outline.
Paper is thin and low-mass. It reaches ignition temperature quickly. Too much dwell time causes most burn marks. Dwell rises when speed is too low. It increases when the beam pauses at corners. It grows when the motion system slows on tight curves.
Software and motion control matter as much as wattage. A clean paper cut comes from coordinated choices. These include path strategy, acceleration limits, corner behavior, and airflow. Airflow clears smoke before it stains the fibers.
CO2 vs Diode Lasers for Paper: Which One Fits Your Job
For most paper cutting, a CO2 laser works best. It shines in speed, consistent edge quality, and production throughput. Paper absorbs CO2 wavelength well. Many CO2 platforms add stable motion systems and effective exhaust.
A diode laser can cut paper well too. It fits small-format, low-volume work. The tradeoff is time and process stability. This shows when you push detail density or want fast batch output.
Below is a practical comparison. It helps you choose based on your work, not just specs.
| Factor | CO2 Laser (typical fit) | Diode Laser (typical fit) |
|---|---|---|
| Best for | Fast, repeatable cutting; commercial batches; clean edges | Small runs; hobby/light production; budget setups |
| Throughput | Higher speeds are easier to achieve | Often slower in practice on dense designs |
| Edge consistency | Typically stronger when airflow/exhaust are tuned | Can be excellent, but more sensitive to setup |
| Workspace control | Many systems support robust exhaust/bed options | Varies widely by platform and enclosure |
| Learning curve | Moderate; benefits from process discipline | Moderate; requires careful tuning to avoid scorch |
We do not recommend stack cutting for paper with either laser type. Most paper work suits single sheets. Airflow can lift top layers. This creates misalignment or ignition risk.
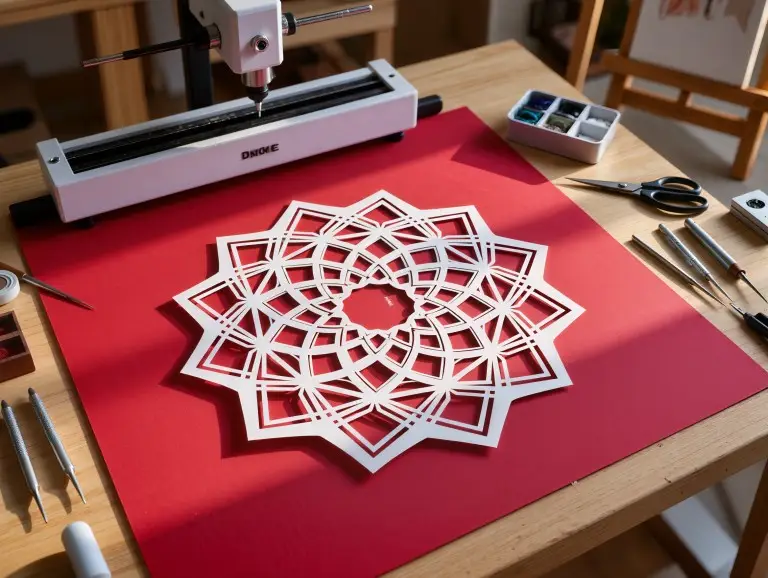
Best Paper for Laser Cutting: Types, Thickness, and Coatings
The best paper stays flat. It cuts cleanly at your speed. It leaves little soot. Thickness, fiber structure, surface coating, and color affect heat spread. They influence smoke deposits on the edge.
For general use, common office-grade paper works well. Use ~80–100 gsm range as a baseline. Thicker cardstock can cut well. But it needs slower motion. Give more attention to corners and smoke.
Copy & Bond Paper: Copy and bond papers are easy to find. They cut cleanly with low power and high speed. They suit test cards and fine geometry checks. Their weakness is curling and lift. This happens if airflow is too strong.
Cardstock: Cardstock holds sharp details in finished parts. It keeps shape better. It handles assembly well. Reduce speed for complex patterns. Tune corner behavior to avoid brown corners.
Kraft Paper: Kraft paper shows edge discoloration more. It can cut well. But smoke control matters more. Good exhaust helps. Conservative heat input keeps the edge clean.
Cardboard: Cardboard suits models and mockups. It makes more smoke. It can show back-side marks if the bed reflects heat. Use a honeycomb or pin table. Keep airflow stable. Slow down on direction changes.
Recycled / Marker / Specialty Papers: Recycled and specialty sheets vary by fiber mix and fillers. This changes cut response and staining. Run a small test series first. Do this before a batch.
Coated / Glossy / Printed Papers: Coatings and heavy ink change smoke condensation. They alter heat spread. These papers can cut. But they need test cuts. Pay strict attention to ventilation. If the surface discolors easily, prioritize speed and airflow. Do this over ultimate edge whiteness.
Setup and Baseline Settings to Cut Paper Without Burning
Clean paper cutting needs heat control per unit length. Prevent smoke from settling back into the cut edge.
Start with single sheets. Use the lowest power that cuts through. Raise speed until cuts fail. Step back a bit for margin.
Starting-point logic
Choose a low-to-moderate power setting. Pick a high travel speed. Paper needs little power to cut. Excess power leads to scorching.
Percent-based settings vary by machine. Machines differ in maximum power, optics, spot size, and delivered wattage. Use cut outcome as your guide. Aim for full cut-through, minimal browning, and no heavy soot.
A simple calibration loop works well:
- Run a small test card. Use several speed steps at one conservative power level.
- Find the fastest speed that cuts through cleanly.
- If cut-through fails at reasonable speeds, increase power a bit. Repeat.
Focus, kerf, and corner control
Corners burn more. Motion slows to change direction. This raises dwell time. It increases heat. The fix is better corner behavior, not more air or power.
Ways to reduce corner burn include:
- Lower corner power if your controller allows it.
- Reduce overall power a bit. Compensate with speed on straight segments.
- Adjust acceleration/jerk. Avoid pauses at sharp nodes.
- Round internal corners a bit in the design when okay. This keeps motion smoother.
Keep focus accurate. Poor focus spreads energy. It widens the kerf. It grows the heat affected area. It makes edges look darker. Follow your machine’s focusing steps. Recheck after material changes.
Air assist and exhaust
Air assist clears smoke from the kerf. It reduces glowing debris in the cut. Too much air can lift light sheets. This ruins alignment.
Use minimum airflow. It must keep the kerf clear without fluttering the paper. If the sheet moves, reduce air pressure. Add gentle hold-down. Or switch to a bed that supports the sheet evenly.
Exhaust is key for clean results. Poor exhaust lets smoke recirculate. It deposits as staining on the cut edge and surface.
Bed and hold-down
Do not lay paper on a solid flat surface. Heat and reflections from the bed can mark the back side. This affects lighter papers. A honeycomb bed or pin table cuts backside scorch. It lets the beam pass through. It spreads heat.
If paper lift happens often, use these methods:
- Low-tack tape at the corners. Keep it outside the cut area.
- Small magnets on a ferromagnetic bed if compatible.
- A light frame or fixture. It holds the perimeter flat.
- Reduced air assist with stronger exhaust.
From File Prep to Finished Parts
A stable workflow stops most paper failures. Avoid surprises like double cutting, overlapping lines, and tiny disconnected islands. These lift mid-cut.
Design file checklist
Start with clean vectors. Join paths. Close them where needed. Avoid duplicates. Overlapping lines cause burning. The laser passes twice.
Keep cut layers organized. For engraving and cutting jobs, engrave first. Cut last. Parts stay in place.
If your design has fine bridges, plan part stability. In production, small tabs cut part movement. They improve yield.
Test cuts and quick calibration
Test on scrap from the same paper batch first. Include straight segments, tight corners, and small radii. Paper acts differently on corner-heavy patterns than long straight cuts.
Use the test to adjust one variable at a time:
- For brown edges: reduce power, increase speed, or improve corner control.
- For no cut-through: increase power a bit or reduce speed a bit.
- For soot deposits: improve exhaust, reduce dwell, ensure airflow clears the kerf.
Cutting execution and handling
Monitor the cut. Paper ignites quickly. Spot issues early. If you see glowing at the kerf or flame, stop the job. Fix settings or airflow first.
When removing parts, avoid pulling delicate sections up. Lift the sheet. Let small pieces drop free. Use gentle tools to release fragile details. Avoid tearing.
For clean presentation parts, keep hands and the bed clean. Paper picks up oils and soot easily. This can look like burn marks later.
Quality, Safety, and Troubleshooting
Paper cutting is safe and repeatable. Treat it as a controlled thermal process, not casual craft. Prevent ignition. Control smoke. Maintain consistent motion.
Safety essentials
Use protective eyewear for your laser wavelength. Keep the process enclosed when possible. Avoid shared spaces. Reflections and beam exposure can affect others.
Never leave paper cutting unattended. Keep a suitable fire extinguisher nearby. Clear the work area of loose scraps. Stop if you see flame or glowing debris.
Smoke/fume control
Ventilation protects health. It improves cut quality. Unremoved smoke settles on paper fibers. It shows as brown or gray staining. Stable exhaust reduces flare-ups from hot debris.
If you see haze in the enclosure, fix it. It is a quality and safety issue. Improve airflow. Check filters and ducts for restrictions.
Troubleshooting map
Use this defect map to diagnose common failures.
| Symptom | Most likely cause | Fast fix |
|---|---|---|
| Brown edges / scorch | Excess heat input (too slow, too much power, corner dwell) | Increase speed, reduce power, enable corner power reduction |
| Not cutting through | Heat input too low or focus off | Increase power slightly, reduce speed slightly, re-focus |
| Heavy soot / staining | Poor exhaust, smoke recirculation, too much dwell | Improve exhaust, speed up, reduce power, clear kerf with stable air assist |
| Back-side marks | Flashback/heat from solid bed | Use honeycomb/pin bed, increase stand-off, reduce underside reflections |
| Paper moves / flutters | Air assist too strong, sheet too light, poor hold-down | Reduce air, add gentle hold-down, use better bed support |
| Fine details break/tear | Partial cut-through or weak bridges | Ensure full cut-through, adjust design bridges, add tabs |
Common mistakes
A common mistake is forcing a cut with more power. The real issue is dwell time. On paper, power rarely limits. Motion and smoke control do.
Another error is cutting on a flat surface. This causes back-side marks. A proper bed setup often helps more than parameter changes.
Skipping test cuts wastes time. Paper varies by batch. A two-minute test saves rework.
Conclusion
Paper laser cutting makes sharp, repeatable parts. It gives clean edges. Control heat input, corners, and smoke. In most production, CO2 lasers give easy speed and consistency. Diode lasers fit smaller, lower-volume work.
For reliable results, start with right paper. Cut single sheets. Use a honeycomb or pin table. Tune settings with a test card. Keep airflow stable. Prioritize exhaust. Treat corner dwell as a key quality factor.
At Yonglihao Machinery, we support professional laser cut services.We do it for prototypes and small-batch production. Customers need precision and fast iteration. Share your paper type, thickness (gsm), design file, and quantity target. We can suggest a stable cutting approach. We deliver clean, repeatable parts.
FAQ
Can you laser cut paper without burning it?
Yes, you can. Minimize dwell time. Control smoke. Use low power with high speed. Keep focus accurate. Reduce corner overburn with corner-power or motion tuning. Test on scrap from the same paper batch before production.
What paper should I avoid (coatings, very thin sheets)?
Avoid very thin papers at first. They curl. They ignite easily under heat and airflow. Coated or glossy papers are not forbidden. But they need cautious testing. They stain more easily. They behave inconsistently. If a sheet gives strong odor or excessive smoke, stop. Check ventilation and material fit.
What settings should I start with on my machine?
Start with low-to-moderate power. Use high travel speed. Tune by outcome. The starting point depends on your machine’s delivered power and optics. Use a small test card with speed steps. Target full cut-through with minimal browning. Keep a small safety margin for batch variation.
Why do corners burn more than straight lines?
Corners burn because the machine slows to change direction. This raises dwell time at the corner. Extra time increases local heat. It darkens the edge. Fix it by reducing corner power. Smooth corner geometry where okay. Tune acceleration to avoid pauses.
Can I stack multiple sheets to cut faster?
In most cases, no. Paper stacks shift under airflow. Laser focus depth is limited. Upper sheets can lift, shift, or ignite. Cut quality turns inconsistent. For repeatable results and safety, cut single sheets. Optimize speed and nesting instead.
CO2 vs diode: which is better for production vs hobby use?
CO2 suits production better. It gives faster throughput. It offers consistent results. Pair it with strong exhaust and stable motion. Diode fits hobby or light-production for paper. Paper cuts with low power. But diode is sensitive to setup on dense designs or high-volume output.