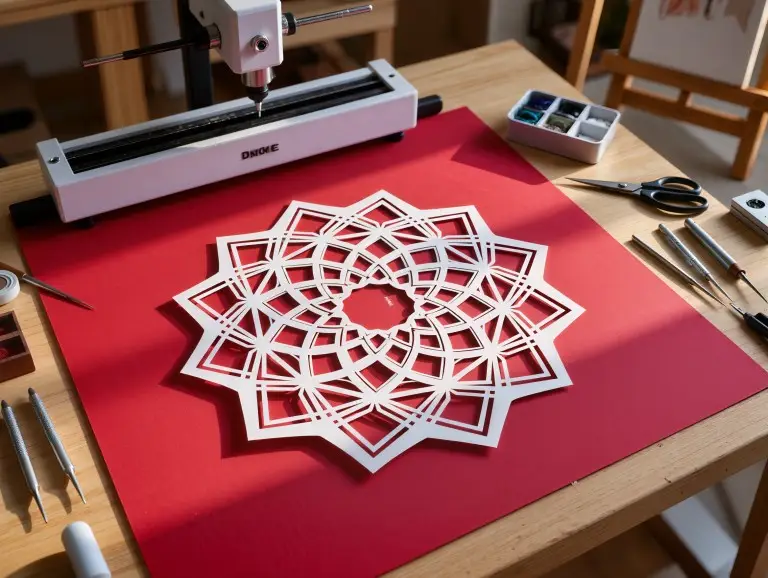

Brass has a premium look and machines well. Because of this, it appears everywhere in prototypes. We see it used for nameplates, decorative trims, and electrical parts. It is also used for hardware that needs to resist corrosion. The problem is simple: brass is also one of the hardest sheet metals to laser cut.
At Yonglihao Machinery, we are a prototype manufacturing service company. Laser cutting is one of our main processes. When customers bring us brass projects, they usually want two things. They want a clean edge and tight details. This guide explains our approach to brass laser cutting with fiber lasers. It covers the most important parameters and how to fix common problems that waste time and scrap parts.
What Is Brass Laser Cutting?
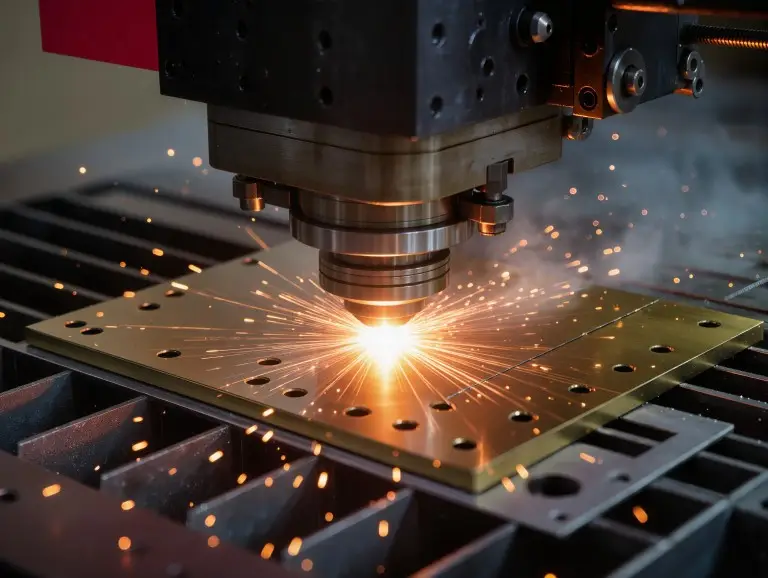
Brass laser cutting is a thermal process. A focused laser beam melts the brass. Then, an assist gas blows the molten metal out of the cut path, or kerf. This gas is not optional for brass; it helps make the cut possible and repeatable. The process is non-contact. This means the sheet is not bent or damaged like it can be with shearing or punching.
In practice, laser cutting is great for brass prototypes. It allows for fine details, quick changes, and consistent shapes from part to part. The trade-off is that brass acts differently than mild steel. If you treat brass like any other metal, you will struggle with unstable piercing, dross, burrs, and failed cuts.
Further Reading: Top 7 Laser Cutting Materials
Why Brass Is Challenging to Laser Cut?
High Reflectivity and Back-Reflection Risk
Brass is very reflective, mainly due to its copper content. This reflectivity lowers the amount of laser energy the surface absorbs at the start of a cut. It also raises the risk of energy reflecting back toward the machine’s optics and laser source.
This makes brass cutting both a quality and a process stability challenge. If the first pool of molten metal forms quickly, reflectivity drops. The cutting then becomes more stable. If the melt pool forms slowly, the process can bounce between partial melting and reflection. This is where most failures begin.
Low Absorption Before the First Melt
Before brass melts, it absorbs less laser energy than many other metals. This means the most vital part of the job is the beginning: piercing the material and creating a stable cut path. Once brass is molten, it absorbs energy better. The cut can then proceed smoothly if you maintain the melt and eject it well.
This also explains why “almost cutting through” is a common issue with brass. The cut might look good for a moment and then stop. This happens if the melt pool collapses or the gas ejection fails. Restarting the cut often requires a second pierce, which is the worst-case scenario for stability and edge quality.
Heat Buildup and Distortion on Thin Brass
Brass conducts heat very well. On thin sheets, heat can spread fast. This can cause local warping, discolored edges, and size changes on small features. On thicker plates, heat is less about warping. It becomes more about how cleanly you can remove the molten metal from the cut.
For prototypes, distortion is often a hidden problem. A part might seem to cut through, but small tabs lift up. Holes might shift slightly, or corners may round more than you want. The solution is rarely a single setting. It is usually a mix of cutting order, assist gas performance, and how you support the sheet.
Why We Use Fiber Lasers for Brass Parts?
Shorter Wavelength Improves Energy Coupling
For brass, fiber lasers are often the practical choice. Their wavelength is absorbed better by metals than the longer wavelength of CO₂ systems. Better absorption helps you form the first melt pool faster. This moment determines if the job will be stable or become a cycle of reflection and failure.
In prototype work, this reliable start matters as much as cutting speed. A stable pierce and a consistent cut path save more time than trying to gain a little extra speed.
Higher Power Density Shortens Piercing Time
Power density is the amount of power focused into a small spot. It controls how quickly brass turns from solid to liquid at the pierce point. Higher power density shortens the time the material is highly reflective. This reduces the chance of unstable piercing and helps protect the machine’s optics.
This also explains why power needs increase quickly with thickness. If you do not have enough power to pierce fast, you might still cut the brass. But your process will be sensitive and have a narrow window for success. In production, a narrow window means more scrap parts.
What This Changes in Edge Quality and Repeatability
A fiber laser does not remove all burrs or dross. But it does give you a wider, more stable cutting window. With a stable window, you can focus on what matters for prototypes: clean edges, small features, and repeatable sizes. It also helps you keep the heat-affected zone small when you use the right focus and strong assist gas.
In short, fiber lasers let you spend your time improving quality, not just trying to keep the cut going.
Further Reading: Types of Laser Cutters
Key Setup Variables and Starting Parameters
Brass cutting works best when you control a few variables very carefully. We see these as the “process levers” that decide if a cut is clean, consistent, and safe.
Laser Power vs. Brass Thickness
Use the highest practical power your system can safely deliver for the thickness you are cutting. Higher power reduces the time needed to melt the brass. This shortens the reflective stage and makes the cut more stable. For example, a 1000 W setting can work for 0.04-inch brass. A 4000 W setting is often needed for 0.25-inch brass, depending on the machine and gas setup.
Power alone is not the whole story. If you raise the power without changing the speed, focus, and gas, you might get too much melt, a wider cut, or discolored edges. Think of power as what enables stability. Then, use the other settings to improve edge quality.
Cut Speed
A slightly slower cutting speed often makes brass cutting more stable. A good starting point is about 10–15% below the maximum speed your system can handle for that thickness. The goal is to keep the cut from stopping. Re-piercing brass is where many quality and safety issues begin.
Slower does not mean “crawl.” If you go too slow, heat builds up, edges discolor, and dross can increase as the melt pool gets too large. The right speed is one that keeps a steady cut path with consistent melt ejection.
Focus Position
For brass, keep the focus near the top surface while still getting a good cut. A focus biased to the top increases power density where the cut starts. This speeds up the initial melting and helps stabilize the pierce and early cut formation. It also helps with fine detail work because the beam is concentrated at the beginning of the cut.
If the focus is too high or too low, you will usually see it right away. Too high can cause poor penetration and an unstable cut. Too low can widen the top edge, increase taper, and create a messy melt pool that the gas cannot clear.
Assist Gas
For most brass cutting, nitrogen is the standard assist gas. It is inert and helps create clean edges with little oxidation. In brass cutting, nitrogen’s job is mechanical. It blows molten metal out of the cut and stops it from reattaching. When gas delivery is weak, dross becomes a constant problem.
High-pressure delivery is often needed for thicker brass, small cuts, and high-quality edges. The nozzle’s condition, alignment, and distance from the sheet also matter more than many teams think. If the nozzle is worn, off-center, or dirty, even perfect settings can lead to dross and burrs.
Quick setup checklist (use this before changing many parameters at once):
- Confirm the nozzle is clean, centered, and right for the thickness.
- Confirm assist gas pressure is stable while flowing, not just at the regulator.
- Start with high power, slightly reduced speed, and a top-biased focus.
- Stabilize the pierce first, then work on the edge quality.
Our Practical Workflow for Brass Laser Cutting
In prototype work, consistent results come from a consistent workflow. This is the process we follow to make brass cutting predictable.
Design and File Prep
Start by preparing the CAD file for the laser. Very tight inside corners, thin walls, and tiny tabs can warp or blow out from the heat. With brass, small features also gather more heat, so you need clean toolpaths and a smart cut order.
For precision prototypes, we check the key tolerance areas. We decide which edges need the best quality versus just an acceptable one. This choice affects speed, gas strategy, and whether we add small joints to prevent movement.
Material Prep
Clean the brass surface to remove oil, fingerprints, and tarnish. Dirt and oils can change how the first melt forms and can increase discoloration around the cut. Flatness is important because the focus and nozzle distance are only correct if the sheet is level.
Fixturing is a quiet driver of quality. If the sheet lifts during cutting, the focus shifts, gas flow becomes weaker, and the cut can fail. For thin brass, stable support and good support slats reduce vibration and help spread heat.
Piercing Strategy for Reflective Brass
Piercing is the high-risk stage. The goal is to turn solid, reflective brass into a stable molten pool as fast and safely as possible. A controlled piercing strategy, often with staged power, can reduce spatter and stabilize the start.
Once the pierce is stable, keep the cut continuous when you can. Avoid stopping and starting on critical edges. Every restart acts like a small pierce and can leave marks, extra dross, or local discoloration.
Cut Execution and In-Process Checks
During cutting, we watch three things: the sound of the cut, the look of the plume, and the dross on test parts. A stable brass cut usually has a consistent plume and steady ejection. An unstable cut sputters, has intermittent sparks, or shows sudden changes in plume direction.
If we see dross starting to build, we fix the gas delivery and speed before adjusting power. If the cut starts to fail, we slow down a bit and re-check the focus and nozzle alignment. The goal is to correct the process before it leads to re-piercing.
Post-Cut Finishing
Even good brass cuts can leave small edge flaws. Deburring removes sharp edges and improves how parts fit and feel. Cleaning removes residue and helps restore the brass look, especially for display-ready parts.
For parts that must stay bright, think about adding a surface protection step after cleaning. Brass can tarnish over time, and handling speeds this up. For prototypes, we often focus on clean, safe edges first. Then we add protection if the project needs it.
Common Problems
Brass will tell you what is wrong if you read the symptoms correctly. The fastest way to troubleshoot is to match the defect to the most likely cause. Then, adjust one setting at a time.
Burrs and Rough Edges
Burrs on brass often signal unstable melt ejection. They can also mean the cut path is collapsing. Start by checking nitrogen delivery and the nozzle condition. Poor gas flow creates burrs even with enough power. Then, check that the focus position is still near the top surface.
If burrs continue, reduce the speed slightly to keep the cut from stopping. If you reduce speed too much, burrs may turn into dross. Make small changes and test again on scrap material.
Dross/Slag on the Bottom Edge
Dross on the bottom edge usually points to weak assist gas performance. Increase nitrogen pressure within your machine’s safe limits. Confirm the nozzle is aligned and not damaged. Dross can also increase when the speed is too slow and the melt pool gets too big.
If you only have dross in certain areas, look at heat buildup and cut order. Cutting nearby features one after another can overheat the area and change how the metal melts. Spacing out the toolpath or changing the sequence can reduce this.
Incomplete Cuts or Cut Extinguishing
If the cut stops, the main goal is to avoid re-piercing on important edges. Incomplete cuts often happen when the speed is a little too high for the power and gas delivery. This is especially true if the sheet is not perfectly flat.
Lower the speed slightly. Confirm the focus and nozzle distance, and check that the sheet is supported well. If failures happen around tight corners or small details, reduce the corner speed or adjust the path to keep the energy input steady.
Edge Discoloration or Tarnish
Discoloration is usually from heat exposure. Reduce heat by increasing speed slightly, but only if the cut stays stable. Keep nitrogen flow strong to clear the molten metal. Poor gas flow can let heat linger because the metal reattaches and reheats.
Also, check how clean the material is. Oils can burn and leave stains. Clean sheet stock and good post-cut cleaning can greatly improve the look of your parts.
Warping on Thin Sheets
Warping happens when heat builds up faster than the sheet can release it. Improve your support, change the cut order to reduce local heat, and avoid cutting many tight features in the same area back-to-back. With thin brass, even small changes to settings can affect flatness.
If warping is bad, think about adding tiny joints to keep parts from dropping or lifting mid-cut. You can remove them during finishing. This is often faster than fighting with unstable parts throughout the cut.
Conclusion
Clean brass cutting is not about one “magic setting.” It is about shortening the reflective phase with a fast, stable pierce. It requires keeping a consistent molten cut and using nitrogen to eject the melt cleanly. When power, speed, focus, and gas work together, brass becomes predictable. This is true even for tight prototype tolerances and fine details.
At Yonglihao Machinery, we build prototypes and small-batch parts. We use our laser cutting service to turn designs from CAD into reality fast. If you have a brass project and want clean edges, repeatable features, and fewer test runs, share your drawing and target thickness with us. We will help you choose a stable cutting approach and deliver parts that fit the first time.
FAQ
What laser type is best for cutting brass?
A fiber laser is usually the best choice. Its wavelength is absorbed better by metals. This helps you form a molten pool quickly, which makes cutting reflective copper alloys more stable. CO₂ systems can struggle more with brass because the material reflects a lot of the beam’s energy.
Why do we prefer nitrogen for brass cutting?
Nitrogen is preferred because it supports cleaner edges with very little oxidation. It works by mechanically pushing molten brass out of the cut path. This is key for controlling dross. If nitrogen delivery is weak, you will often see slag on the bottom edge even if the power is high enough.
How does thickness change power and speed choices?
Thicker brass usually needs higher power and lower speed to keep a stable molten cut. The goal is to pierce quickly and keep the cut from stopping. Re-piercing is unstable and hurts edge quality. A good rule is to start with high power, then adjust speed and gas to meet your thickness and quality needs.
Can brass be cut for intricate designs reliably?
Yes, but you need a stable pierce, correct focus, and strong gas ejection. Intricate features concentrate heat, so the cut order and support matter more than on simple shapes. For prototypes, it often helps to space out close features in the toolpath. This avoids overheating a small area.
What maintenance matters most with reflective metals?
Clean, aligned optics and a well-kept nozzle system are most important. Reflective metals are hard on poor alignment and dirty optics. Stability depends on predictable energy and gas flow. Regular checks of the nozzle, its centering, and gas pressure prevent many “random” brass cutting failures.
Why does the cut sometimes look fine and then suddenly fail?
This usually happens when the cut loses stability. Small changes in heat, focus, or gas flow can cause this. Brass cuts well once it is molten. But if the gas ejection becomes uneven or the sheet moves, the cut can stop quickly. Small speed reductions and better support often restore stability without big changes.